Preface: The Challenges of MCU Development and the Value of Rust
The microcontroller domain has been dominated by the C programming language for decades. C's proximity to hardware, concise syntax, and efficient execution naturally made it the preferred choice for embedded development. However, as microcontroller applications become increasingly complex, the demands for code quality and development efficiency continue to rise.
In recent years, Rust has emerged prominently across multiple domains including web backend, system tools, operating systems, and Web3, with embedded development being no exception. Rust was designed from the ground up with system programming requirements in mind, and in resource-constrained environments like microcontrollers, its "zero-cost abstractions" principle becomes particularly important — you can write high-level, safe, and readable code without worrying about runtime overhead. Rust also brings numerous advantages of modern languages: compile-time memory safety checks eliminate most buffer overflow and null pointer dereference risks; the ownership system makes concurrent programming safer and more controllable; rich type systems and trait mechanisms support high-level abstraction and code reuse without introducing runtime overhead; and the package management system makes dependency handling and code reuse straightforward. These features directly address many challenges faced in microcontroller development.
Rust was once criticized for its steep learning curve, but this situation is changing. With increasingly abundant online tutorials and resources, plus the maturation of various development tools, getting started with Rust has become much easier. Particularly for C engineers, the two languages share many commonalities — like C, Rust can directly manipulate hardware registers and memory, maintaining precise low-level control while providing a safer and more modern programming experience. Many memory issues that require careful attention in C can be caught at compile time in Rust, saving significant debugging time. In microcontroller programming, this compile-time checking is especially valuable because debugging on microcontrollers is often much more difficult than on PC applications.
This guide is written for C programmers who want to try Rust for microcontroller development. We'll use practical examples to compare the similarities and differences between the two languages, explain how to use Rust's features to address various challenges in microcontroller development, how to improve development efficiency, and how to write more reliable embedded programs without sacrificing performance.
Online tutorials about Rust are now very abundant, but most start from scratch or target developers from other backgrounds. As a C microcontroller engineer, I hope to approach this from our perspective, integrating existing excellent resources to help everyone master Rust microcontroller development more quickly. I will reference and cite many excellent tutorials, but the focus will be on how to migrate C language experience and thinking patterns to Rust, helping everyone avoid detours. This text is more like a directory or primer to guide you into Rust microcontroller development.
I strongly recommend completing the reading of the following resources first, as this text will extensively reference these excellent materials:
Asynchronous Programming in Rust
Environment Setup: Advantages of Modern Toolchains
Embedded C toolchains require different toolchains for different target platforms, which is the first challenge most microcontroller developers encounter. ARM platforms require ARM-GCC or ARMCC installation, 8051 needs Keil C51 or SDCC, ESP32 uses xtensa-esp32-gcc/riscv-32... and many other RISC-V architecture microcontrollers. Toolchains for different platforms are incompatible with each other. Every time developers switch to a different chip platform, they often need to reconfigure the entire environment. Even for the same CPU architecture, different manufacturers and series of microcontrollers may require different SDK and toolchain configurations.
C Language Development Approach
In principle, we can develop directly using GCC combined with programming and debugging tools. However, C language requires writing makefiles or cmake files, and debugging can also be quite cumbersome.
In C language ARM microcontroller development, many developers use IDEs like Keil5 or IAR:
For example, Keil requires first downloading from the official website and activating it, then configuring the corresponding SoC toolkit


Many manufacturers also provide their own integrated development environments. For example, TI's CCS can be used to compile and debug TI's microcontrollers, DSPs, Bluetooth SoCs, and other processor chips.

ST company provides CubeIDE for their own SoCs.

NXP company provides NXP MCUXpresso

There are also many manufacturers that customize their own SoC development environments through Eclipse or VSCode.
Each chip manufacturer often has their own IDE and toolchain, such as STM32CubeIDE, NXP MCUXpresso, ESP-IDF, etc. This causes developers to need to relearn a set of tools when switching platforms, making project porting difficult and learning costs high.
In comparison, the Rust embedded development ecosystem provides a more modern and unified toolchain experience.
Rust Environment Configuration
First, let's install the Rust toolchain
For Windows users, just one line:
curl --proto '=https' --tlsv1.2 -sSf https://sh.rustup.rs | sh
The Rust ecosystem consists of many tools, mainly including:
-
rustc: The Rust compiler that converts .rs files to binary files and other intermediate formats.
-
cargo: Rust dependency manager and build tool. Cargo knows how to download dependencies hosted at https://crates.io and pass them to rustc when building projects. Cargo also comes with a built-in test runner for executing unit tests.
-
rustup: Rust toolchain installation and update tool. When Rust releases new versions, this tool is used to install and update rustc and cargo. Additionally, rustup can download standard library documentation. Multiple versions of Rust can be installed simultaneously, and rustup allows you to switch between these versions as needed.
Using the rustup tool, you can quickly configure support for different embedded platforms:
rustup target add thumbv6m-none-eabi  # Add ARM Cortex-M0 support
rustup target add thumbv7m-none-eabi  # Add ARM Cortex-M3 support
rustup target add riscv32imac-unknown-none-elf  # Add RISC-V32imac support
After this, the basic configuration environment for compiling Rust is complete. Then comes programming and debugging for the embedded environment.
Programming and Debugging
Besides using traditional openocd and debuggers through command line or IDE, you can also use the powerful tool probe-rs in the Rust ecosystem.
probe-rs implements adaptation for different SoC manufacturers and different debugging protocols.

Using probe-rs, you can quickly implement programming and debugging of compiled code.
In .cargo/config.toml, add the corresponding compilation target platform, for example stm32g031:
[target.'cfg(all(target_arch = "arm", target_os = "none"))']
# replace STM32G031G8Ux with your chip as listed in `probe-rs chip list`
runner = "probe-rs run --chip STM32G031G8Ux"
You can then program and run code on the target platform with the cargo run command:
cargo run --release --target thumbv6m-none-eabi
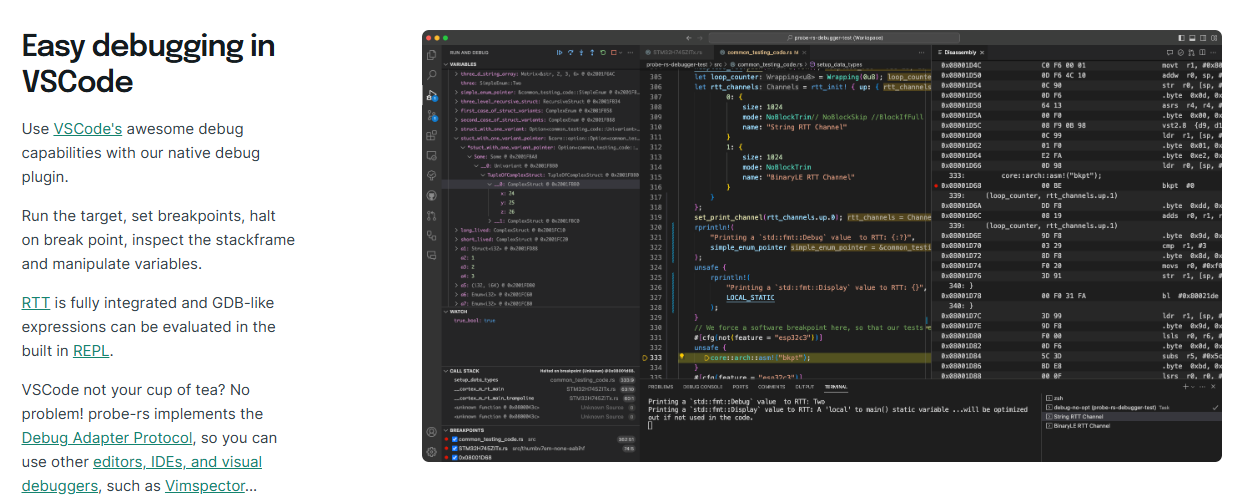
probe-rs also supports integration with IDEs like VSCode/CLion for breakpoint debugging. For details, refer to probe-rs-vscode
"Printf debugging" is also common in microcontroller programming. probe-rs uses the debugger's RTT and defmt to implement very low latency and non-blocking log printing to the computer. In code, you can use defmt macros like debug!, error!, info! etc. to directly implement different log printing.
#![allow(unused)]
fn main() {
defmt::info!("This is an info message: {}", 42);
defmt::warn!("This is a warning message: {}", true);
defmt::debug!("This is a debug message: {}", "hello");
defmt::error!("This is an error message: {}", 3.14);
defmt::println!("This is a println message: {}", 42);
defmt::assert!(1 + 1 == 2, "Assertion failed: 1 + 1 != 2");
}
Complete code example:
#![no_main]
#![no_std]

use defmt::info;
use defmt_rtt as _; // Use RTT as transport layer
use panic_probe as _; // Use probe as panic handler

#[cortex_m_rt::entry]
fn main() -> ! {
    info!("This is an info message: {}", 42);
    defmt::debug!("This is a debug message: {}", "hello");
    defmt::warn!("This is a warning message: {}", true);
    defmt::error!("This is an error message: {}", 3.14);
    defmt::trace!("This is a trace message: {}", [1, 2, 3]);

    defmt::assert!(1 + 1 == 2, "Assertion failed: 1 + 1 != 2");
    defmt::assert_eq!(1 + 1, 2, "Assertion failed: 1 + 1 != 2");
    defmt::assert_ne!(1 + 1, 3, "Assertion failed: 1 + 1 == 3");

    let mut buffer = [0u8; 32];
    defmt::write!(&mut buffer, "Hello, {}!", "world");

    let args = defmt::format_args!("Hello, {}!", "world");
    defmt::println!("This is a println message: {}", 42);

    defmt::log!(defmt::Level::Info, "This is a log message: {}", 42);

    loop {}
}
For specific implementation and principles, refer to defmt-book.
The usage here is seamless. After the microcontroller project executes cargo run, it calls probe-rs. probe-rs has SEGGER's RTT built-in, sending logs to the computer via RTT.
Thus, through Rust tooling ecosystem, basic configuration can be completed very simply, and compilation and debugging can be easily achieved without needing specific IDEs.
Type System: Compile-Time Safety and Zero-Cost Abstractions
Rust's type system provides powerful compile-time safety guarantees for embedded development while maintaining zero runtime overhead characteristics, which is particularly important for resource-constrained microcontroller development.
Type Safety Issues in C Language
Directly manipulating low-level registers in embedded systems can easily cause hardware damage, system instability, or security vulnerabilities if used improperly. Traditional C language relies on runtime checks, technical documentation, and project management standards to avoid these problems. For example, incorrect pin configuration, pin configuration conflicts, etc.
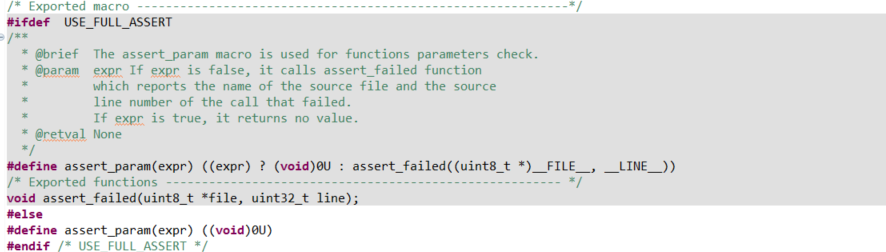
Here's an example of STM32 GPIO configuration:
void HAL_GPIO_WritePin(GPIO_TypeDef *GPIOx, uint16_t GPIO_Pin, GPIO_PinState PinState)
{
  /* Check parameters */
  assert_param(IS_GPIO_PIN(GPIO_Pin));
  assert_param(IS_GPIO_PIN_ACTION(PinState));

  if (PinState != GPIO_PIN_RESET)
  {
    GPIOx->BSRR = GPIO_Pin;
  }
  else
  {
    GPIOx->BSRR = (uint32_t)GPIO_Pin << 16u;
  }
}
In the C language code above, we can see several typical safety hazards:
- Runtime Parameter Checking: The function uses
assert_paramto check parameter validity at runtime, which increases program size and execution time, and completely fails when optimization compilation is enabled or assertions are disabled. Moreover, assert_param is disabled by default and needs to be manually enabled via macros.
-
Lack of Type Safety: The function accepts any
GPIO_TypeDefpointer, and the compiler cannot check whether the passed GPIO peripheral has been correctly initialized or is valid. -
Unclear State: There is no type system guarantee that the GPIO pin has been correctly configured as output mode. Even if the pin is configured as input, analog, or other functions, this function can still compile and execute, potentially causing abnormal hardware behavior.
For example, setting a GPIO initialized as input to low level:
  GPIO_InitStruct.Pin = KEY_Pin;
  GPIO_InitStruct.Mode = GPIO_MODE_INPUT;
  GPIO_InitStruct.Pull = GPIO_NOPULL;
  HAL_GPIO_Init(KEY_GPIO_Port, &GPIO_InitStruct);//Configure as input mode
  HAL_GPIO_WritePin(KEY_GPIO_Port, KEY_Pin, GPIO_PIN_RESET);//Set to low level
This code will not report errors during compilation or runtime, but this operation is logically unreasonable and may lead to undefined behavior or hardware issues. C code must rely on runtime checks and developer carefulness rather than utilizing the compiler for static guarantees.
Rust's Type State Pattern
Rust allows us to encode state at the type system level, making state transition errors become compile errors rather than runtime crashes. Here we look at pseudo-code for a GPIO implementation in Rust:
#![allow(unused)]

fn main() {
pub struct Input<MODE> { _mode: PhantomData<MODE> }
pub struct Output<MODE> { _mode: PhantomData<MODE> }
pub struct Floating; pub struct PullUp; pub struct PullDown; pub struct PushPull; pub struct OpenDrain;

pub struct Pin<const P: char, const N: u8, MODE> { _mode: PhantomData<MODE> }

impl<const P: char, const N: u8, MODE> Pin<P, N, Input<MODE>> {
    pub fn is_high(&self) -> bool { !self.is_low() }
    pub fn is_low(&self) -> bool { ...implementation... }
    pub fn into_push_pull_output(self) -> Pin<P, N, Output<PushPull>> { ...implementation... Pin { _mode: PhantomData } }
    pub fn into_open_drain_output(self) -> Pin<P, N, Output<OpenDrain>> { ...implementation... Pin { _mode: PhantomData } }
}

impl<const P: char, const N: u8, MODE> Pin<P, N, Output<MODE>> {
    pub fn set_high(&mut self) { ...implementation... }
    pub fn set_low(&mut self) { ...implementation... }
    pub fn toggle(&mut self) { ...implementation... }
    pub fn into_floating_input(self) -> Pin<P, N, Input<Floating>> { ...implementation... }
}

// Usage example
fn gpio_example() {
    ...initial configuration...
    let mut output_pin = input_pin.into_push_pull_output();
    // Set output state
    output_pin.set_high();
    output_pin.set_low();
    output_pin.toggle();

    // Compile error examples:
    output_pin.is_high();  // ❌ Compile error: Output pins don't have is_high method
    input_pin.set_high();  // ❌ Compile error: input_pin has been consumed (moved)
    // Convert pin back to input mode
    let input_pin = output_pin.into_floating_input();
    let state = input_pin.is_high(); // ✓ Correct: Input pins can read state
}
}
Compared to the C language implementation shown earlier, this actual Rust library implementation demonstrates several key advantages:
-
Type State Encoding: The pin's state (input/output) is directly encoded in type parameters, allowing the compiler to statically verify operation validity. For example, output pins don't have an
is_high()method, and input pins don't have aset_high()method. -
Safe State Transitions: Pin state transitions are implemented through methods that consume the old state and return a new state (like
into_push_pull_output()), ensuring completeness and irreversibility of state transitions, preventing use of old state references. -
Ownership System Guarantees: Rust's ownership system ensures that only one piece of code can operate a specific pin at any time, avoiding concurrent access and configuration conflicts.
-
Zero Runtime Overhead: Despite providing rich safety guarantees, these safety checks are performed at compile time, and runtime code is equivalent to hand-optimized C code.
PhantomDatais a zero-sized type that occupies no memory.
PhantomData and Zero-Cost Abstractions
Above we used PhantomData<T>, which is a special type in the Rust standard library used to mark the existence of a certain type or lifetime at compile time, but does not actually occupy memory space.
In the above example, it represents various pin states and configuration types:
#![allow(unused)]
fn main() {
// PhantomData is used to mark MODE in the type system, but occupies no actual memory
pub struct Pin<const P: char, const N: u8, MODE> {
    _mode: PhantomData<MODE>, // Zero-sized type, occupies no memory after compilation
}

// Different mode types are also zero-sized types
pub struct Input<MODE> { _mode: PhantomData<MODE> }
pub struct Output<MODE> { _mode: PhantomData<MODE> }
pub struct Floating;
pub struct PushPull;
}
Role of PhantomData
-
Type Marking:
PhantomData<MODE>tells the compiler that the Pin struct is related to the MODE type, even though it doesn't store actual values of the MODE type. -
Zero-Sized Type:
PhantomData<T>is a zero-sized type (ZST), meaning it typically occupies no memory space after compilation. This ensures our abstractions don't introduce runtime overhead. -
Type Safety: Through PhantomData, the compiler can enforce type rules at compile time, such as preventing calls to
is_high()method on output pins.
Compile-Time State Encoding Implementation
In the STM32 GPIO example, we use generic parameters to represent pin states:
#![allow(unused)]
fn main() {
// Input pin with pull-up resistor
let pin: Pin<'A', 5, Input<PullUp>> = ...;

// Output pin in push-pull output mode
let pin: Pin<'A', 5, Output<PushPull>> = ...;
}
When pin state changes, instead of modifying internal fields (which would typically involve modifying a state flag in C), we return a completely new type of object:
#![allow(unused)]
fn main() {
// Input to output, consumes input pin, returns output pin
pub fn into_push_pull_output(
    self
) -> Pin<P, N, Output<PushPull>> {
    // Hardware configuration...
    Pin { _mode: PhantomData }
}
}
We can examine the compiled assembly code, comparing versions with and without type safety checks:
#![allow(unused)]
fn main() {
// Rust version (with type state checking)
fn toggle_led(led: &mut Pin<'A', 5, Output<PushPull>>) {
    led.toggle();
}

// Compiles to roughly the same assembly instructions:
// ldr r0, [r0]       // Load pin register address
// ldr r1, [r0, #16]  // Read ODR register
// eor r1, r1, #32    // Flip corresponding bit
// str r1, [r0, #16]  // Write back to ODR register
// bx lr              // Return
}
While the safe C language version requires runtime checks:
// Safe C language version
void toggle_led_safe(GPIO_TypeDef* gpio, uint16_t pin) {
    if (gpio == NULL) return;
    if (pin > 15) return;
    // ...other runtime checks
    gpio->ODR ^= (1 << pin);
}

// Compiles to more instructions:
// cmp r0, #0         // Check NULL
// beq .return
// cmp r1, #15        // Check pin range
// bhi .return
// ...other runtime checks
// ldr r2, [r0, #16]  // Actual operation
// ...
For GPIO with relatively few states, some complex peripherals may have more states, such as I2C, SPI, UART, etc. In this case, C language needs to implement through complex macros or state machines, while Rust can implement through the type system.
PhantomData Lifetime Marking
Rust's lifetime system is one of the cores of its memory safety guarantees, especially important when handling hardware resources in embedded systems. Lifetimes are a mechanism used by the compiler to track reference validity, ensuring that references don't outlive the data they point to.
In C language, we need to manually track pointer validity, which easily leads to problems like dangling pointers or using freed memory. Rust enforces reference safety through compile-time checks.
The lifetime concept is briefly mentioned here only for partial applications in embedded scenarios. Recommend reading The Rust Programming Language or Official Rust Documentation for deeper understanding.
Lifetimes and Embedded Systems
In embedded development, lifetimes are particularly useful in DMA (Direct Memory Access) operation scenarios. DMA allows peripherals to directly access memory, bypassing the CPU, to improve data transfer efficiency. But this also brings a challenge: we must ensure that during DMA operations, the related memory regions remain valid and unmodified.
Let's compare how C and Rust handle this problem:
// DMA transfer in C language - safety depends on developer carefulness
void start_dma_transfer(uint8_t* buffer, size_t size) {
    // Configure DMA and start transfer
    DMA_Config(DMA1, buffer, size);
    DMA_Start(DMA1);
    // Dangerous: C compiler doesn't prevent modifying or freeing buffer during DMA transfer
    // This entirely depends on the developer remembering and avoiding it
}

// Usage example
void example_function(void) {
    uint8_t local_buffer[64];
    // Fill buffer
    for (int i = 0; i < 64; i++) {
        local_buffer[i] = i;
    }
    // Start DMA transfer
    start_dma_transfer(local_buffer, 64);
    // Dangerous: DMA might still be ongoing, but buffer is about to go out of scope
    // C compiler won't warn about this problem

    // Possible solution: wait for DMA completion, but this depends on developer remembering to do so
    while(DMA_GetStatus(DMA1) != DMA_COMPLETE) { }
}
C language has no built-in mechanism to track pointer validity range or lifetime, relying entirely on developers. Even if developers are careful themselves, it's still easy to make mistakes.
Now let's see how Rust uses PhantomData and lifetimes to solve this problem:
#![allow(unused)]
fn main() {
// DMA transfer in Rust - compile-time safety guarantee
struct DmaTransfer<'buffer> {
    dma: &'static mut DMA_TypeDef,
    _buffer: PhantomData<&'buffer mut [u8]>, // Mark buffer lifetime
}

impl<'buffer> DmaTransfer<'buffer> {
    // Start DMA transfer
    pub fn new(dma: &'static mut DMA_TypeDef, buffer: &'buffer mut [u8]) -> Self {
        // Configure DMA
        unsafe {
            (*dma).source_addr = buffer.as_ptr() as u32;
            (*dma).byte_count = buffer.len() as u32;
            (*dma).control = DMA_ENABLE;
        }

        DmaTransfer {
            dma,
            _buffer: PhantomData, // Track buffer lifetime but don't store it
        }
    }

    // Wait for transfer completion
    pub fn wait(self) -> Result<(), Error> {
        unsafe {
            while (*self.dma).status & DMA_COMPLETE == 0 {}
            (*self.dma).control = 0; // Disable DMA
        }
        Ok(())
    }
}

// Drop implementation ensures DMA is stopped when DmaTransfer is dropped
impl<'buffer> Drop for DmaTransfer<'buffer> {
    fn drop(&mut self) {
        unsafe {
            // Ensure DMA is stopped
            (*self.dma).control = 0;
        }
    }
}

// Usage example
fn example_function() {
    let mut buffer = [0u8; 64];
    // Fill buffer
    for i in 0..64 {
        buffer[i] = i as u8;
    }
    // Get DMA peripheral
    let dma = unsafe { &mut *(DMA1 as *mut DMA_TypeDef) };
    // Start DMA transfer
    let transfer = DmaTransfer::new(dma, &mut buffer);
    // Compile error examples:
    buffer[0] = 99; // ❌ Error: buffer is borrowed, cannot modify
    drop(buffer);   // ❌ Error: buffer is borrowed, cannot be dropped early
    // Correct usage: wait for transfer completion
    transfer.wait().unwrap();
    // Now can safely use buffer
    println!("Transfer completed, first byte: {}", buffer[0]);
    // If we don't call wait(), at function end:
    // 1. transfer's Drop implementation will ensure DMA is stopped
    // 2. Then buffer will be freed
}
}
Rust implementation achieves the following:
-
Lifetime Tracking:
PhantomData<&'buffer mut [u8]>tells the compiler that DmaTransfer holds a reference to buffer, and its lifetime is bound to 'buffer. -
Borrow Checking: The compiler ensures buffer is not modified or freed while DMA is using it. Any attempt to modify an already borrowed buffer will cause a compile error.
-
Resource Management: Through Drop implementation, even in exceptional situations (such as early return or panic), DMA will be properly stopped.
-
Zero Runtime Overhead:
PhantomDataoccupies no memory space, and all safety checks are completed at compile time.
In C language, we might use comments and naming conventions to remind developers, or add runtime checks and complex state tracking mechanisms, but this increases overhead and is still not as reliable as compile-time checks.
Through Rust's lifetime system and PhantomData, we can build APIs that are both safe and efficient, letting the compiler help us catch potential resource usage errors, which is particularly important in embedded systems because such errors often lead to hard-to-debug problems.
Embedded-HAL: Cross-Platform Ecosystem
Embedded-HAL (Hardware Abstraction Layer) is the foundation of Rust's embedded ecosystem. It defines a series of standard traits for abstracting common embedded peripheral operation interfaces. Its core goals are:
- Provide hardware-agnostic peripheral abstraction interfaces
- Allow writing generic drivers that can run on different chips and platforms
- Establish a unified embedded and system software development ecosystem to promote code reuse
Differences from Traditional C/C++ Embedded Libraries
In traditional embedded development, HAL libraries from different vendors and platforms are usually incompatible:
// STM32 HAL library example
HAL_StatusTypeDef HAL_GPIO_WritePin(GPIO_TypeDef *GPIOx, uint16_t GPIO_Pin, GPIO_PinState PinState);

//MSP432 library example
void GPIO_setOutputHighOnPin(uint_fast8_t selectedPort,uint_fast16_t selectedPins);
These differences cause:
- Drivers must be rewritten for each platform
- Code cannot be easily migrated to different hardware
- Ecosystem fragmentation and duplicate work
Embedded-HAL solves this problem by defining unified trait interfaces, much like Arduino libraries such as digitalWrite etc., but Rust's trait system is more powerful and can implement more complex abstractions.
#![allow(unused)]
fn main() {
// Unified interface defined by Embedded-HAL
pub trait OutputPin {
    type Error;
    fn set_high(&mut self) -> Result<(), Self::Error>;
    fn set_low(&mut self) -> Result<(), Self::Error>;
}

// Different platforms implement the same interface
// Some platform implementation
impl OutputPin for PA0 {
    type Error = Infallible;
    fn set_high(&mut self) -> Result<(), Self::Error> { ... }
    fn set_low(&mut self) -> Result<(), Self::Error> { ... }
}

// Another platform implementation
impl OutputPin for GpioPin<Output, IO0> {
    type Error = Infallible;
    fn set_high(&mut self) -> Result<(), Self::Error> { ... }
    fn set_low(&mut self) -> Result<(), Self::Error> { ... }
}
}
As you can see, different platforms implement the same interface, but the interface implementation methods are different, yet the interface usage is the same.
What is a Trait
Trait (Rust language official documentation) is Rust's mechanism for defining shared behavior, similar to interfaces or abstract classes in other languages, but with more powerful features:
- Static Dispatch: The compiler determines the specific implementation at compile time, avoiding runtime overhead of dynamic lookup
- Associated Types: Allows defining dependent types within traits, enhancing type safety
- Generic Constraints: Traits can be used as generic constraints, providing compile-time guarantees
- Composition Capability: Traits can be combined to form more complex abstractions
If you have limited Rust experience, this concept might seem abstract. Here we just need to know that Traits are a mechanism for defining shared behavior.
C language can also implement similar interfaces, for example:
// C language simulating interfaces
typedef struct {
    void (*set_high)(void* ctx);
    void (*set_low)(void* ctx);
    void* ctx;
} gpio_ops_t;

// Usage example
void toggle_led(gpio_ops_t* gpio) {
    gpio->set_high(gpio->ctx);
    // Delay
    gpio->set_low(gpio->ctx);
}
This approach has the following drawbacks:
- Runtime overhead (function pointer calls)
- No compile-time type checking
- Interface implementation errors can only be discovered at runtime
- Need to manually manage context pointers
Rust's Traits combined with the type system mentioned above provide compile-time safety guarantees while avoiding runtime overhead of dynamic lookup.
Embedded-HAL Ecosystem
The Embedded-HAL ecosystem consists of multiple interconnected crates:
- embedded-hal: Defines basic blocking interfaces
- embedded-hal-async: Async versions of the interfaces
- embedded-hal-nb: Interfaces based on nb (non-blocking) mode
- embedded-can: CAN bus specific interfaces
- embedded-io/embedded-io-async: Generic I/O interfaces
For specific implementations, refer to the Embedded-HAL official repository
Drivers written using embedded-hal can run on any hardware that implements the corresponding traits: For example, the SSD1306 driver we'll use in the upcoming example:
#![allow(unused)]
fn main() {
// Generic SSD1306 OLED display driver
pub struct Ssd1306<I2C> {
    i2c: I2C,
    // ...other fields
}

impl<I2C, E> Ssd1306<I2C>
where
    I2C: embedded_hal::i2c::I2c<Error = E>,
{
    // Any device that implements the I2c trait can use this driver
    pub fn new(i2c: I2C) -> Self {
        // ...initialization code
    }

    pub fn display(&mut self, buffer: &[u8]) -> Result<(), E> {
        // ...use I2C to display data
    }
}
}
With I2C as a generic parameter, this driver can be used simultaneously with:
- STM32 series
- ESP32
- nRF52 series
- RP2040 (Raspberry Pi Pico)
- And many other hardware that implement the I2c trait
In actual projects, we can use the same driver on different hardware, which is very helpful for product development iteration.
Elegant Error Handling
In embedded-hal code, you can see common error handling methods in Rust, such as:
#![allow(unused)]
fn main() {
// Using Result type to return errors
pub fn write(&mut self, address: u8, data: &[u8]) -> Result<(), Error> {
    // ...
}
}
Rust's error handling has significant advantages over C language. Let's compare through a pseudo-code example - suppose we need to read data from multiple sensors, process them, and then send the results:
// C language error handling - using return codes
typedef enum {
    ERR_OK = 0,
    ERR_I2C_BUS,
    ERR_SENSOR_TIMEOUT,
    ERR_INVALID_DATA,
    ERR_UART_BUSY,
    // ...more error types
} error_t;

// Read sensor
error_t read_temperature_sensor(float* result) {
    // Initialize I2C bus
    if (i2c_init() != ERR_OK) {
        return ERR_I2C_BUS;
    }
    // Read sensor
    uint8_t raw_data[4];
    error_t err = i2c_read(SENSOR_ADDR, raw_data, sizeof(raw_data));
    if (err != ERR_OK) {
        return err; // Propagate error
    }
    // Check data validity
    if (raw_data[3] != calculate_checksum(raw_data, 3)) {
        return ERR_INVALID_DATA;
    }
    // Convert data
    *result = convert_to_temperature(raw_data);
    return ERR_OK;
}

// Usage example
void process_sensor_data(void) {
    float temperature;
    error_t err = read_temperature_sensor(&temperature);
    // Error handling - common if-else branches
    if (err == ERR_OK) {
        printf("Temperature: %.2f C\n", temperature);
    } else if (err == ERR_I2C_BUS) {
        printf("I2C bus error\n");
        // May forget to handle certain errors
    } else if (err == ERR_SENSOR_TIMEOUT) {
        printf("Sensor timeout\n");
    } else if (err == ERR_INVALID_DATA) {
        printf("Invalid data received\n");
    } else {
        printf("Unknown error: %d\n", err);
    }
    // Easy to forget checking errors
    error_t another_err = send_data(&temperature);
    // Missing check for another_err here
}
Now let's see the equivalent Rust implementation:
// Rust error handling - using enums and Result types
#[derive(Debug)]
enum SensorError {
    I2cBus(I2cError),      // Contains underlying error
    SensorTimeout,
    InvalidData,
    UartBusy(UartError),   // Contains underlying error
}

// Automatic conversion from I2C error, avoiding manual error mapping
impl From<I2cError> for SensorError {
    fn from(err: I2cError) -> Self {
        SensorError::I2cBus(err)
    }
}

// Read sensor
fn read_temperature_sensor() -> Result<f32, SensorError> {
    // Initialize I2C bus - ? operator automatically propagates errors
    let i2c = i2c_init()?;
    // Read sensor - ? operator automatically handles and converts errors
    let raw_data = i2c.read(SENSOR_ADDR, 4)?;
    // Check data validity
    if raw_data[3] != calculate_checksum(&raw_data[0..3]) {
        return Err(SensorError::InvalidData);
    }
    // Convert data
    Ok(convert_to_temperature(&raw_data))
}

// Usage example
fn process_sensor_data() -> Result<(), SensorError> {
    // Read sensor - ? automatically propagates errors
    let temperature = read_temperature_sensor()?;
    // Can immediately use result because error has been handled
    println!("Temperature: {:.2} C", temperature);
    // Send data - errors will be automatically converted
    send_data(&temperature)?;
    // Return success when everything is OK
    Ok(())
}

// Use pattern matching in main function to handle errors
fn main() {
    match process_sensor_data() {
        Ok(()) => println!("Processing completed"),
        // Comprehensive error matching, compiler ensures all cases are handled
        Err(err) => match err {
            SensorError::I2cBus(bus_err) => {
                println!("I2C bus error: {:?}", bus_err);
                // Can further handle specific I2C errors
            },
            SensorError::SensorTimeout => println!("Sensor timeout"),
            SensorError::InvalidData => println!("Invalid data received"),
            SensorError::UartBusy(uart_err) => {
                println!("UART busy: {:?}", uart_err);
            },
        },
    }
}
For the above code, we can see that Rust's implementation has the following advantages:
-
?operator simplifies error propagation: Compared to C language where you need to check return values after every call, Rust's?operator makes error propagation concise. -
Typed and composable errors: Rust's errors are typed and can contain additional information, not just integer codes. This makes error handling more precise and expressive.
-
Compiler-enforced error handling: If you don't handle
Result, the compiler will issue a warning, preventing missed error checks. -
Pattern matching ensures completeness: When using
matchto handle errors, the compiler ensures all possible error types are handled. -
No performance loss: Rust's error handling model is resolved at compile time, with almost no runtime overhead, equivalent to C code that manually checks error codes.
-
Automated error conversion: Through the
Fromtrait implementation, automatic conversion between different error types can be achieved, reducing manual mapping code.
In embedded systems, reliable error handling is particularly important because errors often mean hardware interaction problems, which can lead to system instability. Rust's error handling mechanism maintains low-level control capability while providing higher-level abstractions, making code safer and more maintainable without introducing additional runtime overhead.
Embedded Async Programming: A New Embedded Programming Paradigm
Traditional embedded development is mainly based on bare-metal polling and RTOS task models, but both models have their respective limitations.
Bare-Metal Polling Model
Bare-metal polling is the simplest programming model in embedded systems, based on an infinite loop (commonly called the "main loop"), where various states and events are checked sequentially in the loop and corresponding processing is performed. This approach is simple and straightforward, doesn't depend on any operating system, and is suitable for simple tasks.
A typical bare-metal application often combines polling with interrupts:
// Global variables for interrupt and main loop communication
volatile uint32_t tick_counter = 0;
volatile bool button_pressed = false;

// Timer interrupt service function
void TIM2_IRQHandler(void) {
    if (TIM2->SR & TIM_SR_UIF) {  // Check update interrupt flag
        tick_counter++;           // Increment counter
        TIM2->SR &= ~TIM_SR_UIF;  // Clear interrupt flag
    }
}

// External interrupt service function
void EXTI0_IRQHandler(void) {
    if (EXTI->PR & EXTI_PR_PR0) {
        button_pressed = true;    // Set button pressed flag
        EXTI->PR = EXTI_PR_PR0;   // Clear interrupt flag
    }
}

int main(void) {
    // System initialization
    SystemInit();
    // Configure timer interrupt and callback
    ......
    uint32_t last_tick = 0;
    // Main loop
    while (1) {
        // Check for button press events
        if (button_pressed) {
            // Handle button event
            LED_Toggle();
            button_pressed = false;  // Clear flag
        }
        // Timer-based periodic tasks
        if (tick_counter - last_tick >= 1000) {  // About every second
            last_tick = tick_counter;
            // Execute periodic tasks
            UpdateSensors();
            UpdateDisplay();
        }
        // Can add more tasks...
    }
}
Although simple and understandable, the bare-metal polling model is often difficult to handle when dealing with complex tasks, has low scalability, and is difficult to handle complex task scheduling. Communication between interrupts and main loop relies on global variables, which easily leads to race conditions and data consistency problems. Rust implementation of bare-metal loops has similar effects but can add more safety features like Atomic.
RTOS Task Model
The RTOS task model is a commonly used programming model in embedded systems that divides system tasks into multiple independent tasks, each running in its own context and scheduled through a task scheduler.
Here we use FreeRTOS as an example. FreeRTOS is an open-source real-time operating system widely used in embedded systems. It provides a task scheduler that manages multiple tasks, each running in its own context and scheduled through the task scheduler.
// FreeRTOS task definition
void vSensorTask(void *pvParameters) {
    while(1) {
        // Wait for sensor data
        if(xSemaphoreTake(sensorDataSemaphore, portMAX_DELAY) == pdTRUE) {
            readAndProcessSensorData();
        }
    }
}

void vUartTask(void *pvParameters) {
    while(1) {
        // Wait for UART data
        if(xSemaphoreTake(uartDataSemaphore, portMAX_DELAY) == pdTRUE) {
            handleUartData();
        }
    }
}

// Task creation
void main() {
    // Create semaphores
    sensorDataSemaphore = xSemaphoreCreateBinary();
    uartDataSemaphore = xSemaphoreCreateBinary();
    // Create tasks
    xTaskCreate(vSensorTask, "Sensor", STACK_SIZE, NULL, PRIORITY_NORMAL, NULL);
    xTaskCreate(vUartTask, "UART", STACK_SIZE, NULL, PRIORITY_HIGH, NULL);
    // Start scheduler
    vTaskStartScheduler();
}
This task model allows us to perform task scheduling more conveniently, and many projects and products are built based on this model. However, RTOS task switching requires saving and restoring context, which affects performance if task switching is frequent. Each task also needs separate stack space, which occupies considerable memory if there are many tasks.
Embedded Async Programming
What is Async Programming
Async programming is a concurrency model that allows tasks to yield execution rights while waiting for I/O or other operations to complete rather than blocking threads or creating new threads. The core idea is:
- Non-blocking execution: Operations return immediately after starting, without waiting for completion
- Callback or await mechanism: Notify or resume execution when operations complete
- Efficient resource utilization: Schedule tasks through state machines rather than thread switching
Synchronous (blocking) operation:
// Synchronous read
result = read_sensor();  // Thread blocks until sensor returns data
process(result);         // Process after read completion
Asynchronous (non-blocking) operation:
// Asynchronous read (pseudo code)
read_sensor_async(callback);  // Start read, return immediately
// Can do other work
// ...
// Callback is called when data is ready
function callback(result) {
    process(result);
}
In embedded systems, this can be understood as RTOS being preemptive scheduling, while async programming is cooperative scheduling.
| Scheduling Type | Characteristics |
|---|---|
| Preemptive Scheduling (RTOS) | Scheduler can interrupt task execution at any time Task switching is triggered by timer or high-priority tasks Tasks cannot choose "appropriate timing" to yield CPU |
| Cooperative Scheduling (Async) | Tasks actively yield execution rights (at await points) System switches to other ready tasks at await points Task switching points are explicit and predictable |
However, cooperative scheduling cannot achieve absolute real-time performance, so for example, esp-idf-hal in esp32 uses FreeRTOS combined with Rust's async programming model.
Future Working Principle and async/await
Rust's async programming model is based on Future and Async, providing powerful async programming capabilities.
Future is the foundation of Rust async programming, representing a computation that may not yet be complete. Here we directly cite content from the async-book:
#![allow(unused)]
fn main() {
trait SimpleFuture {
    type Output;
    fn poll(&mut self, wake: fn()) -> Poll<Self::Output>;
}

enum Poll<T> {
    Ready(T),
    Pending,
}
}
Future can be advanced by calling poll, which advances the future toward completion as much as possible. If the future completes, it returns Poll::Ready(result). If the future is not yet complete, it returns Poll::Pending and arranges for the wake() function to be called when the Future is ready for further progress. When wake() is called, the executor driving the Future will poll again, allowing the Future to make progress.
Without the wake() function, the executor would have no way of knowing whether a future is ready to make progress and would have to continuously poll all futures. But with the wake() function, the executor knows which futures are ready to be polled.
The key to understanding Future lies in its state machine model:
#![allow(unused)]
fn main() {
// Basic working mode of Future
let mut future = some_async_operation();

loop {
    match future.poll(&mut context) {
        Poll::Ready(value) => break value,   // Complete, return result
        Poll::Pending => {
            // Not complete, wait to be woken up then poll again
            wait_for_wakeup();
        }
    }
}
}
This implements the foundation of async programming, but this pattern has several problems: verbose code, complex state tracking, difficult nested callbacks. To solve these problems, Rust introduced async/await syntax sugar.
async/await Syntax Sugar
async/await is Rust's high-level syntax for handling async programming. It converts async code into state machines while maintaining synchronous code writing style:
#![allow(unused)]
fn main() {
// Concise writing with async/await
async fn read_sensor() -> Result<u16, Error> {
    let i2c = I2C::new().await?;
    let value = i2c.read_register(SENSOR_ADDR, TEMP_REG).await?;
    Ok(value)
}

// Calling async function
async fn process_data() {
    match read_sensor().await {
        Ok(data) => println!("Temperature: {}", data),
        Err(e) => println!("Read error: {:?}", e),
    }
}
}
Working Principle of async/await
When you write an async function, the Rust compiler will:
- Generate state machine: Convert the function into a state machine that implements the
Futuretrait - Identify
.awaitpoints: Each.awaitis a point where execution might pause - Save context: Save necessary state at each pause point for resuming execution
- Auto-implement
poll: Generate complex state transition logic
Zero-Cost Abstractions
Rust's async/await is a "zero-cost abstraction" - the compiler translates high-level syntax into efficient state machine code:
- No runtime overhead: Generated code is as efficient as hand-written state machines
- No GC dependency: Doesn't need garbage collection, suitable for resource-constrained environments
- Small memory footprint: Single async task requires less memory than RTOS threads
- Predictable execution: Task switching points are explicit (at
.await), reducing race conditions
For example, a simple async fn code:
#![allow(unused)]
fn main() {
async fn example() {
    let a = step_one().await;
    let b = step_two(a).await;
    step_three(b).await;
}
}
Will be converted by the compiler into a roughly equivalent state machine:
#![allow(unused)]
fn main() {
enum ExampleStateMachine {
    Start,
    WaitingOnStepOne(StepOneFuture),
    WaitingOnStepTwo(StepTwoFuture, StepOneOutput),
    WaitingOnStepThree(StepThreeFuture),
}

impl Future for ExampleStateMachine {
    type Output = ();

    fn poll(self: Pin<&mut Self>, cx: &mut Context<'_>) -> Poll<()> {
        // Complex state transition logic, automatically generated by compiler
        // ...
    }
}
}
Async Runtime and Executors in Microcontrollers
To run async code, an executor is needed to manage Future polling and wakeup. There are several popular async runtimes in embedded Rust, with two typical ones being:
Embassy: Lightweight async runtime designed specifically for embedded systems, supporting various MCUs RTIC: Real-time interrupt-driven concurrency framework
These runtimes are all optimized for resource-constrained environments, providing minimal memory footprint and efficient scheduling.
We mainly introduce Embassy here, which is also a popular async runtime in Rust embedded systems, providing HAL that supports cross-platform development for various MCUs.
Embassy Features
- Static memory allocation: No need for dynamic heap allocation, memory requirements determined at compile time
- Lower memory overhead: Single async task requires much less RAM than RTOS tasks
- Low context switching cost: Task switching doesn't require complete context save/restore
- Type-safe task communication: Provides typed channels and signals for inter-task communication
- Simple programming model: Async programming model is well-suited for embedded development
Embassy Programming Model
Embassy's programming model is very simple, just add the #[embassy_executor::task] attribute to functions:
// Multiple concurrent tasks under Embassy framework
#[embassy_executor::task]
async fn sensor_task(i2c: I2c<'static>) {
    let mut sensor = Bme280::new(i2c);
    loop {
        let reading = sensor.read().await.unwrap();
        // Process sensor data
        Timer::after_secs(1).await;
    }
}

#[embassy_executor::task]
async fn display_task(spi: Spi<'static>, mut display_data: Signal<DisplayData>) {
    let mut display = Display::new(spi);
    loop {
        // Wait for new display data
        let data = display_data.wait().await;
        display.update(&data).await;
    }
}

#[embassy_executor::main]
async fn main(_spawner: embassy_executor::Spawner) {
    ...
    ...
    _spawner.spawn(sensor_task(i2c)).ok();
    _spawner.spawn(display_task(spi, display_data)).ok();
}
Async and DMA
In embedded systems, DMA (Direct Memory Access) is an efficient data transfer method, especially when processing large amounts of data. DMA can bypass the CPU and transfer data directly between memory and peripherals, thus improving data transfer efficiency.
The async programming model and DMA can be said to be very compatible, because the async programming model can avoid CPU blocking while waiting for data transfer, thus utilizing DMA for data transfer, reducing CPU burden for handling I/O.
In Embassy's HAL implementation, most async drivers use DMA transfer as the default implementation, such as I2C, SPI, UART, etc.
Multi-Priority Task Scheduling
Although Embassy's async model is based on cooperative scheduling, it supports preemptive-like multi-priority scheduling. This hybrid model combines the memory efficiency of cooperative scheduling with the real-time responsiveness of preemptive scheduling.
Embassy allows creating multiple executors with different priorities. The official also provides an example:
#[embassy_executor::task]
async fn run_high() {
    loop {
        info!("        [high] tick!");
        Timer::after_ticks(27374).await;
    }
}

#[embassy_executor::task]
async fn run_med() {
    loop {
        let start = Instant::now();
        info!("    [med] Starting long computation");
        // Spin-wait to simulate a long CPU computation
        embassy_time::block_for(embassy_time::Duration::from_secs(1)); // ~1 second
        let end = Instant::now();
        let ms = end.duration_since(start).as_ticks() / 33;
        info!("    [med] done in {} ms", ms);
        Timer::after_ticks(23421).await;
    }
}

#[embassy_executor::task]
async fn run_low() {
    loop {
        let start = Instant::now();
        info!("[low] Starting long computation");
        // Spin-wait to simulate a long CPU computation
        embassy_time::block_for(embassy_time::Duration::from_secs(2)); // ~2 seconds
        let end = Instant::now();
        let ms = end.duration_since(start).as_ticks() / 33;
        info!("[low] done in {} ms", ms);
        Timer::after_ticks(32983).await;
    }
}

static EXECUTOR_HIGH: InterruptExecutor = InterruptExecutor::new();
static EXECUTOR_MED: InterruptExecutor = InterruptExecutor::new();
static EXECUTOR_LOW: StaticCell<Executor> = StaticCell::new();

#[interrupt]
unsafe fn UART4() {EXECUTOR_HIGH.on_interrupt()}

#[interrupt]
unsafe fn UART5() {EXECUTOR_MED.on_interrupt()}

#[entry]
fn main() -> ! {
    info!("Hello World!");
    let _p = embassy_stm32::init(Default::default());
    interrupt::UART4.set_priority(Priority::P6);
    let spawner = EXECUTOR_HIGH.start(interrupt::UART4);
    unwrap!(spawner.spawn(run_high()));
    // Medium-priority executor: UART5, priority level 7
    interrupt::UART5.set_priority(Priority::P7);
    let spawner = EXECUTOR_MED.start(interrupt::UART5);
    unwrap!(spawner.spawn(run_med()));
    // Low priority executor: runs in thread mode, using WFE/SEV
    let executor = EXECUTOR_LOW.init(Executor::new());
    executor.run(|spawner| {
        unwrap!(spawner.spawn(run_low()));
    });
}

//!Output result
//! ```
//!     [med] Starting long computation
//!     [med] done in 992 ms
//!         [high] tick!
//! [low] Starting long computation
//!     [med] Starting long computation
//!         [high] tick!
//!         [high] tick!
//!     [med] done in 993 ms
//!     [med] Starting long computation
//!         [high] tick!
//!         [high] tick!
//!     [med] done in 993 ms
//! [low] done in 3972 ms
//!     [med] Starting long computation
//!         [high] tick!
//!         [high] tick!
//!     [med] done in 993 ms
//! ```
From the output results, you can see high-priority tasks interrupting medium and low-priority tasks.
The priority principle in Embassy is to configure idle interrupts with different priorities, utilizing high-priority interrupts in microcontrollers to interrupt low-priority interrupts, thus achieving multi-priority task scheduling.
This multi-priority approach can improve real-time performance of critical tasks.
Inter-Task Communication
Embassy provides many safe ways for inter-task communication. You can also use Atomic types for inter-task communication.
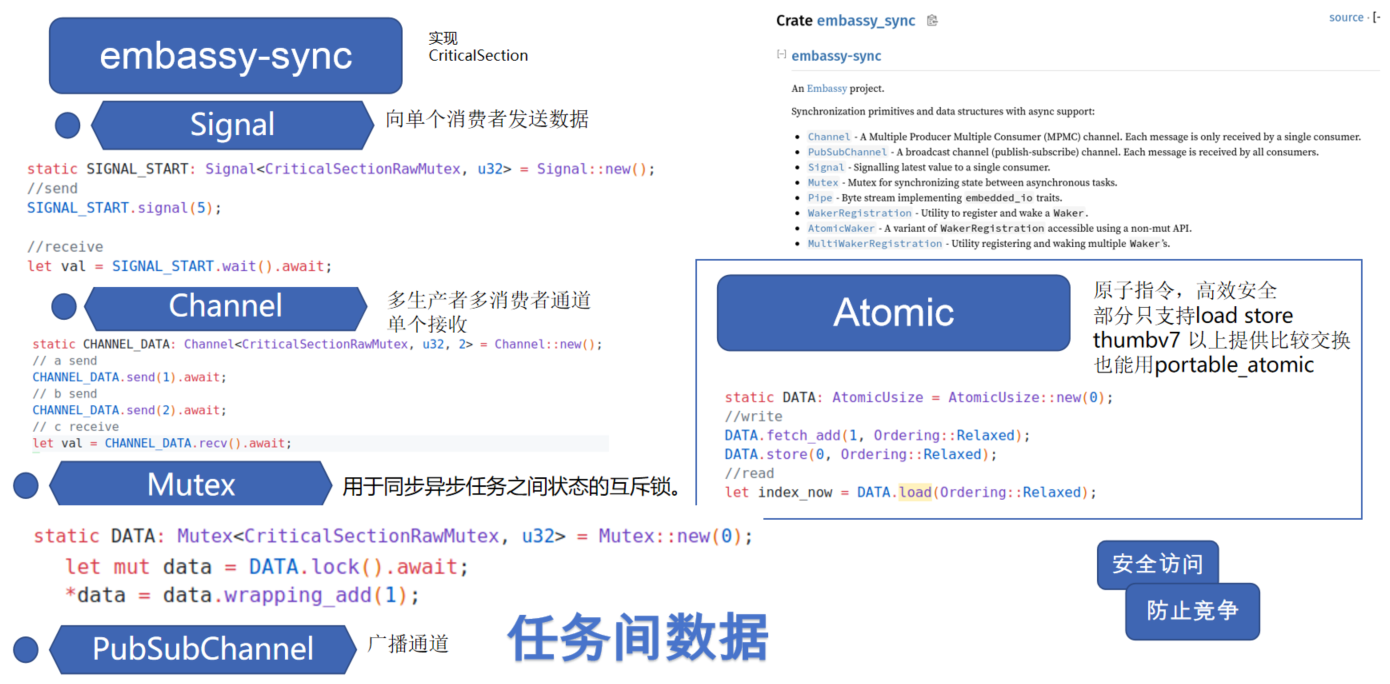
Note that Atomic types depend on underlying hardware support. Operations like load and store are relatively common atomic operations, but on certain architectures or for more complex operations (like atomic add/subtract, compare-and-swap), hardware support varies. The portable-atomic crate provides a unified API that utilizes hardware instructions when available or provides software implementations based on critical sections when hardware doesn't support it, ensuring cross-platform availability.
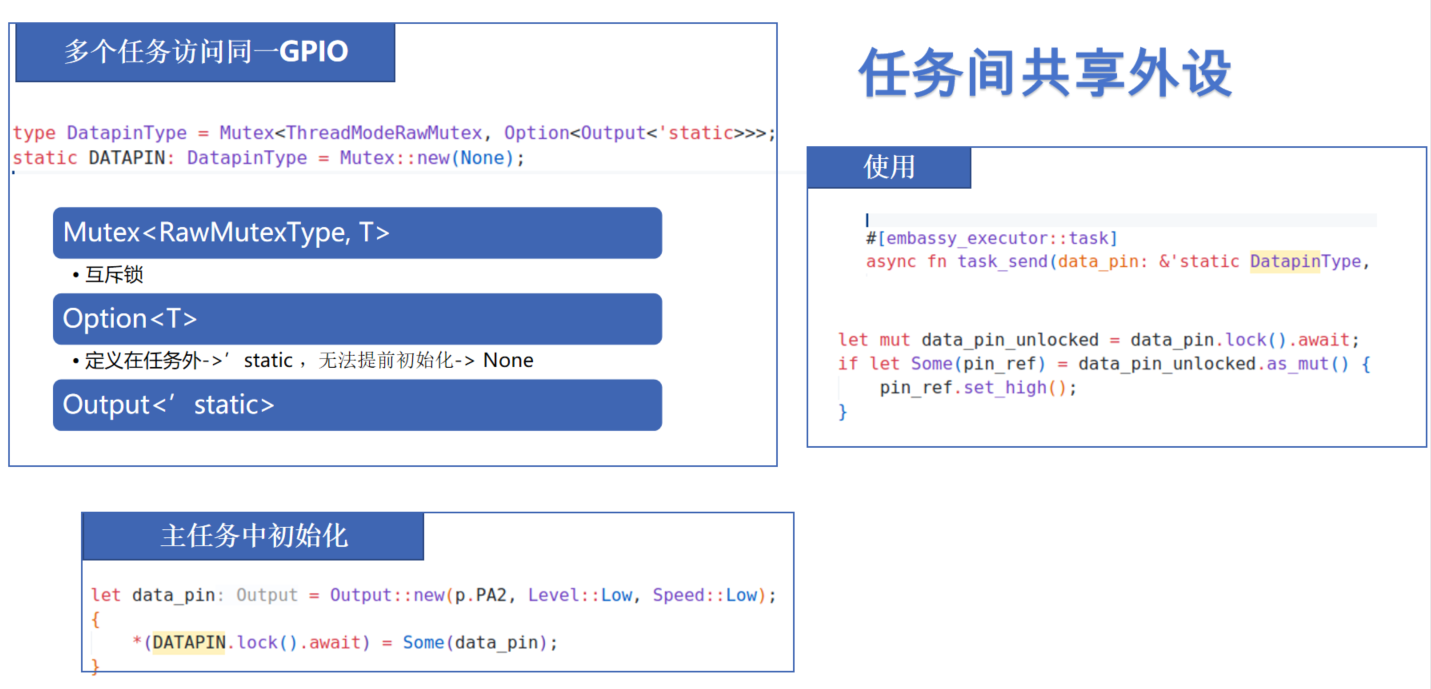
Sharing Peripherals Between Tasks
For multiple tasks using the same peripheral like GPIO, you can use the Mutex mentioned above.
Summary
Embassy and Rust async programming have many more features. I also recommend checking out the Embassy official documentation and async-book. This article also provides some comparisons between Embassy and RTOS: Async Rust vs RTOS showdown!
Embedded async programming also has some limitations to consider:
- Binary size: Compiler-generated state machines may lead to increased code size
- Debugging complexity: Debugging async code is more complex than synchronous code
- Real-time performance: Pure cooperative scheduling is difficult to guarantee hard real-time performance requirements
You need to evaluate solutions based on specific scenarios. RTIC, esp-idf-hal, and many other frameworks also provide solutions combining RTOS thread models with async models.
Embassy porting is also very convenient. Besides officially supported ones, there are now Embassy support for domestic MCUs like py32 and ch32.
Basic Example: SSD1306 OLED Display
Here we use a very simple SSD1306 OLED display example to give everyone a feel for creating and writing Embassy projects.
Creating a Project with cargo-embassy
Embassy provides cargo-embassy, we just need to select the corresponding MCU.
cargo install cargo-embassy
cargo embassy init ssd_demo --chip stm32g031g8
cd ssd_demo
You can see that the project is generated directly:
├──.cargo
│  └──config.toml
├──src
│  ├──fmt.rs
│  └──main.rs
├──build.rs
├──Cargo.lock
├──Cargo.toml
├──Embed.toml
└──rust-toolchain.toml
The core of the main file is printing Hello, World! and then LED blinking:
#[embassy_executor::main]
async fn main(_spawner: Spawner) {
    let p = embassy_stm32::init(Default::default());
    let mut led = Output::new(p.PB7, Level::High, Speed::Low);

    loop {
        info!("Hello, World!");
        led.set_high();
        Timer::after(Duration::from_millis(500)).await;
        led.set_low();
        Timer::after(Duration::from_millis(500)).await;
    }
}
Execute in the directory:
cargo run
This will automatically compile and run the example. You can see the corresponding example output printed in the command line:
    Finished `dev` profile [optimized + debuginfo] target(s) in 23.37s
     Running `probe-rs run --chip STM32G031G8Ux target\thumbv6m-none-eabi\debug\ssd_demo`
      Erasing ✔ [00:00:00] [###############################################################################################################################################] 14.00 KiB/14.00 KiB @ 54.25 KiB/s (eta 0s )  Programming ✔ [00:00:00] [###############################################################################################################################################] 14.00 KiB/14.00 KiB @ 36.94 KiB/s (eta 0s )    Finished in 0.662s
TRACE BDCR configured: 00008200
└─ embassy_stm32::rcc::bd::{impl#3}::init::{closure#4} @ C:\Users\User\.cargo\registry\src\index.crates.io-6f17d22bba15001f\embassy-stm32-0.2.0\src\rcc\bd.rs:280
DEBUG rcc: Clocks { hclk1: MaybeHertz(16000000), hsi: MaybeHertz(16000000), lse: MaybeHertz(0), lsi: MaybeHertz(0), pclk1: MaybeHertz(16000000), pclk1_tim: MaybeHertz(16000000), pll1_p: MaybeHertz(0), pll1_q: MaybeHertz(0), rtc: MaybeHertz(32000), sys: MaybeHertz(16000000) }
└─ embassy_stm32::rcc::set_freqs @ C:\Users\User\.cargo\registry\src\index.crates.io-6f17d22bba15001f\embassy-stm32-0.2.0\src\rcc\mod.rs:71
INFO  Hello, World!
└─ ssd_demo::____embassy_main_task::{async_fn#0} @ src\fmt.rs:131
INFO  Hello, World!
└─ ssd_demo::____embassy_main_task::{async_fn#0} @ src\fmt.rs:131
INFO  Hello, World!
└─ ssd_demo::____embassy_main_task::{async_fn#0} @ src\fmt.rs:131
Creating a Project from Scratch
According to the guidance in embassy-book, we can also start our example step by step. First, we create a Rust project:
cargo new ssd1306_demo
cd ssd1306_demo
We generated an empty project:
├──src
│  └──main.rs
└──Cargo.toml
We're using the stm32g031 processor. Opening the corresponding example in Embassy, we can see there's a .cargo/config.toml file. Let's copy the configuration file over. The example uses:
[target.'cfg(all(target_arch = "arm", target_os = "none"))']
# replace STM32G0B1RETx with your chip as listed in `probe-rs chip list`
runner = "probe-rs run --chip STM32G0B1RETx"
[build]
target = "thumbv6m-none-eabi"
[env]
DEFMT_LOG = "trace"
STM32G0B1RETx is not our current model.
To check supported models, use:
probe-rs chip list
We're using STM32G031G8Ux, so replace STM32G0B1RETx in the runner above.
Now the compiler and debugger know our instruction set and specific chip type.
Next, add dependencies for Embassy and its support libraries:
[dependencies]
embassy-executor = { version = "0.7.0", features = ["arch-cortex-m", "executor-thread"] }
embassy-futures = "0.1.1"
embassy-stm32 = { version = "0.2.0", features = ["memory-x", "stm32g031g8", "time-driver-any", "exti", "unstable-pac"] }
embassy-sync = "0.6.2"
embassy-time = { version = "0.4.0", features = ["tick-hz-32_768"] }
And other build dependencies:
defmt = "0.3.5"
defmt-rtt = "0.4.0"
cortex-m = {version = "0.7.7", features = ["critical-section-single-core"]}
cortex-m-rt = "0.7.3"
panic-probe = "0.3.1"
Finally, copy the [profile.release] section from the example to our Cargo.toml:
[profile.release]
debug = 2
Embassy is constantly being updated, so it's recommended to try installing from the git repository. Here we find the latest version with the command:
git ls-remote https://github.com/embassy-rs/embassy.git HEAD
fb5ce05b26ae0c90a872a8e0787c9419178d475a        HEAD
Add to Cargo.toml:
[patch.crates-io]
embassy-time = { git = "https://github.com/embassy-rs/embassy", rev = "fb5ce05b26ae0c90a872a8e0787c9419178d475a" }
embassy-executor = { git = "https://github.com/embassy-rs/embassy", rev = "fb5ce05b26ae0c90a872a8e0787c9419178d475a" }
embassy-stm32 = { git = "https://github.com/embassy-rs/embassy", rev = "fb5ce05b26ae0c90a872a8e0787c9419178d475a" }
Finally, copy the build script build.rs from the example to the project:
fn main() {
    println!("cargo:rustc-link-arg-bins=--nmagic");
    println!("cargo:rustc-link-arg-bins=-Tlink.x");
    println!("cargo:rustc-link-arg-bins=-Tdefmt.x");
}
This build script configures linker parameters for embedded Rust projects, which is one of the standard configurations for embedded Rust projects.
Directory structure:
├──.cargo
│  └──config.toml
├──src
│  └──main.rs
├──build.rs
└──Cargo.toml
Copy an example from the examples to main.rs and execute:
cargo run
Complete build, programming, and debugging.
Adding Screen Display
SSD1306 is an OLED screen commonly used in embedded systems to display information. Rust provides a package manager, and combined with embedded-hal's cross-platform functionality, we can find the SSD1306 Rust driver and add it to Cargo.toml:
[dependencies]
ssd1306 = "0.10.0"
Since we're using async in Embassy, we need to add features:
[dependencies]
ssd1306 = { version = "0.10.0", features = ["async"] }
Next, add I2C initialization in main.rs:
Embassy generates specific hardware abstraction layer code for each specific MCU model. In this process, only the pins and functions that the MCU actually has are included in the Peripherals struct. Due to Rust's strong type system, when you try to access non-existent peripherals or pins, the compiler can immediately detect the problem and report an error. Here, if we initialize the wrong pin, it will report an error:
#![allow(unused)]
fn main() {
let p = embassy_stm32::init(Default::default());
let mut i2c = I2c::new(p.I2C1, p.PB9, p.PB7, Irqs, p.DMA1_CH1, p.DMA1_CH2, Hertz(100_000), Default::default());
}
The error is as follows:
error[E0609]: no field `PB9` on type `Peripherals`
  --> src\main.rs:28:11
   |
28 |         p.PB9,
   |           ^^^ unknown field
   |
This design of directly reflecting hardware function constraints in the type system has great advantages over traditional C language peripheral libraries.
Correct I2C initialization:
#![allow(unused)]
fn main() {
    let i2c = embassy_stm32::i2c::I2c::new(
        p.I2C1,
        p.PB6,
        p.PB7,
        Irqs,
        p.DMA1_CH1,
        p.DMA1_CH2,
        Hertz::khz(400),
        Default::default(),
    );
}
Create SSD1306 display I2C interface:
#![allow(unused)]
fn main() {
    let interface = I2CDisplayInterface::new(i2c);
}
Create SSD1306 display instance: Specify display size as 128x64 pixels Set display orientation to no rotation (Rotate0) Convert to terminal mode for easier text display:
#![allow(unused)]
fn main() {
    let mut display = Ssd1306Async::new(interface, DisplaySize128x64, DisplayRotation::Rotate0)
        .into_terminal_mode();
}
Initialize display:
#![allow(unused)]
fn main() {
display.init().await.unwrap();
let _ = display.clear().await;
}
This completes the initialization. Add display:
#![allow(unused)]
fn main() {
let _ = display.write_str("Hello Rust!").await;
}
Now you can see Hello Rust! on the screen.

The final code is very simple to implement screen display. Overall code:
//src/main.rs
#![no_std]
#![no_main]
use defmt_rtt as _;
use embassy_executor::Spawner;
use embassy_stm32::{bind_interrupts, i2c, peripherals, time::Hertz};
use panic_probe as _;
use ssd1306::{prelude::*, I2CDisplayInterface, Ssd1306Async};

bind_interrupts!(struct Irqs {
    I2C1 => i2c::EventInterruptHandler<peripherals::I2C1>, i2c::ErrorInterruptHandler<peripherals::I2C1>;
});

#[embassy_executor::main]
async fn main(_spawner: Spawner) {
    let p = embassy_stm32::init(Default::default());
    let i2c = embassy_stm32::i2c::I2c::new(p.I2C1,p.PB6,p.PB7,Irqs,p.DMA1_CH1,p.DMA1_CH2,Hertz::khz(400),Default::default(),);
    let interface = I2CDisplayInterface::new(i2c);
    let mut display = Ssd1306Async::new(interface, DisplaySize128x64, DisplayRotation::Rotate0)
        .into_terminal_mode();
    display.init().await.unwrap();
    let _ = display.clear().await;
    //Display Hello Rust
    let _ = display.write_str("Hello Rust!").await;
    loop {

    }
}
The Irqs struct connects hardware interrupts with handlers through the bind_interrupts! macro.
During I2C initialization, these interrupt handlers are registered with the system.
When I2C communication events occur (such as data transfer completion or errors), corresponding interrupts are triggered.
Interrupt handlers serve as waker implementations, responsible for waking async tasks waiting for these events.
This design allows code to use async/await style programming without needing blocking waits or manual polling. When I2C operations (like read/write) are in progress, the CPU can execute other tasks, and only when operations complete (triggering interrupts) will execution return to continue the unfinished parts of async functions.
This is one of the core advantages of the Embassy framework: seamlessly integrating hardware interrupt mechanisms with Rust's async programming model.
Summary
Through this basic example, we learned about Embassy's project creation, initialization, display, and other basic operations. Embassy provides numerous examples for different platforms that can be found directly in Embassy examples.
Embedding Rust in STM32 C Projects
Rust has excellent C language interoperability. A little Rust with your C introduces how to embed Rust code into C projects.

Simply put, you need to convert Rust types to C types, then generate libraries and header files to include and use in C projects.
But in microcontrollers, static compilation is needed, so you need:
crate-type = ["staticlib"]
Here we use the cargo command to create a simple lib:
cargo new lib_demo --lib
cd lib_demo
Then add to Cargo.toml:
[lib]
name = "lib_demo"
crate-type = ["staticlib"]
Add simple arithmetic operations (addition, subtraction, multiplication, division):
#![allow(unused)]
#![no_std]
fn main() {
/// Addition operation
/// Provide panic handler function for no_std environment
#[panic_handler]
fn panic(_info: &core::panic::PanicInfo) -> ! {
    loop {}
}

#[no_mangle]
pub extern "C" fn add(a: i32, b: i32) -> i32 {
    a + b
}

/// Subtraction operation
#[no_mangle]
pub extern "C" fn subtract(a: i32, b: i32) -> i32 {
    a - b
}

/// Multiplication operation
#[no_mangle]
pub extern "C" fn multiply(a: i32, b: i32) -> i32 {
    a * b
}

/// Division operation (returns safe result, returns preset safe result 0 when dividing by zero)
#[no_mangle]
pub extern "C" fn divide(a: i32, b: i32) -> i32 {
    if b == 0 {
        0 // Prevent divide by zero error
    } else {
        a / b
    }
}

/// Floating point division
#[no_mangle]
pub extern "C" fn divide_float(a: f64, b: f64) -> f64 {
    if b == 0.0 {
        0.0 // Prevent divide by zero error
    } else {
        a / b
    }
}
}
Then write a calling header file:
#ifndef LIB_DEMO_H
#define LIB_DEMO_H

#ifdef __cplusplus
extern "C" {
#endif

// Integer operations
int add(int a, int b);
int subtract(int a, int b);
int multiply(int a, int b);
int divide(int a, int b);

// Floating point operations
double divide_float(double a, double b);

#ifdef __cplusplus
}
#endif

#endif // LIB_DEMO_H
Now you can call the written library from C language. Recommend supplementary reading ffi.
Embedding in STM32CubeIDE
STM32CubeIDE is the official development environment provided by ST. Here we use a CubeIDE project as an example. For STM32CubeIDE introduction, refer to STM32CubeIDE Quick Start Guide.
First, we open CubeIDE and select to create a new project:

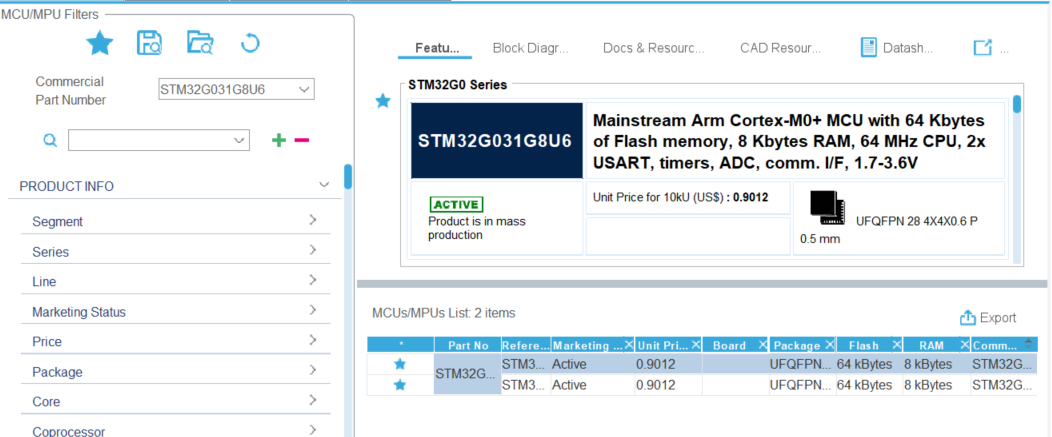
Enter our chip stm32g8u6 and select:
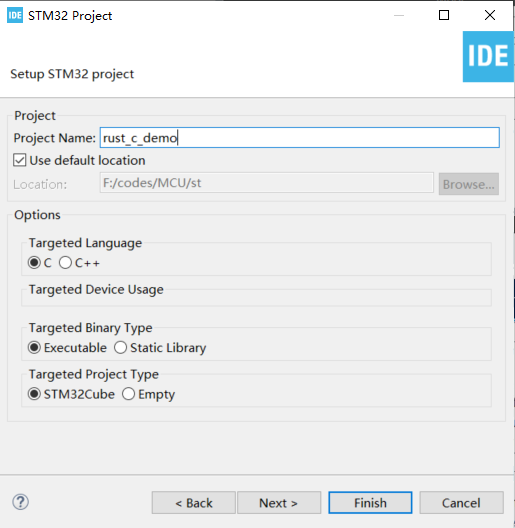
Enter project name and click finish to complete creation:
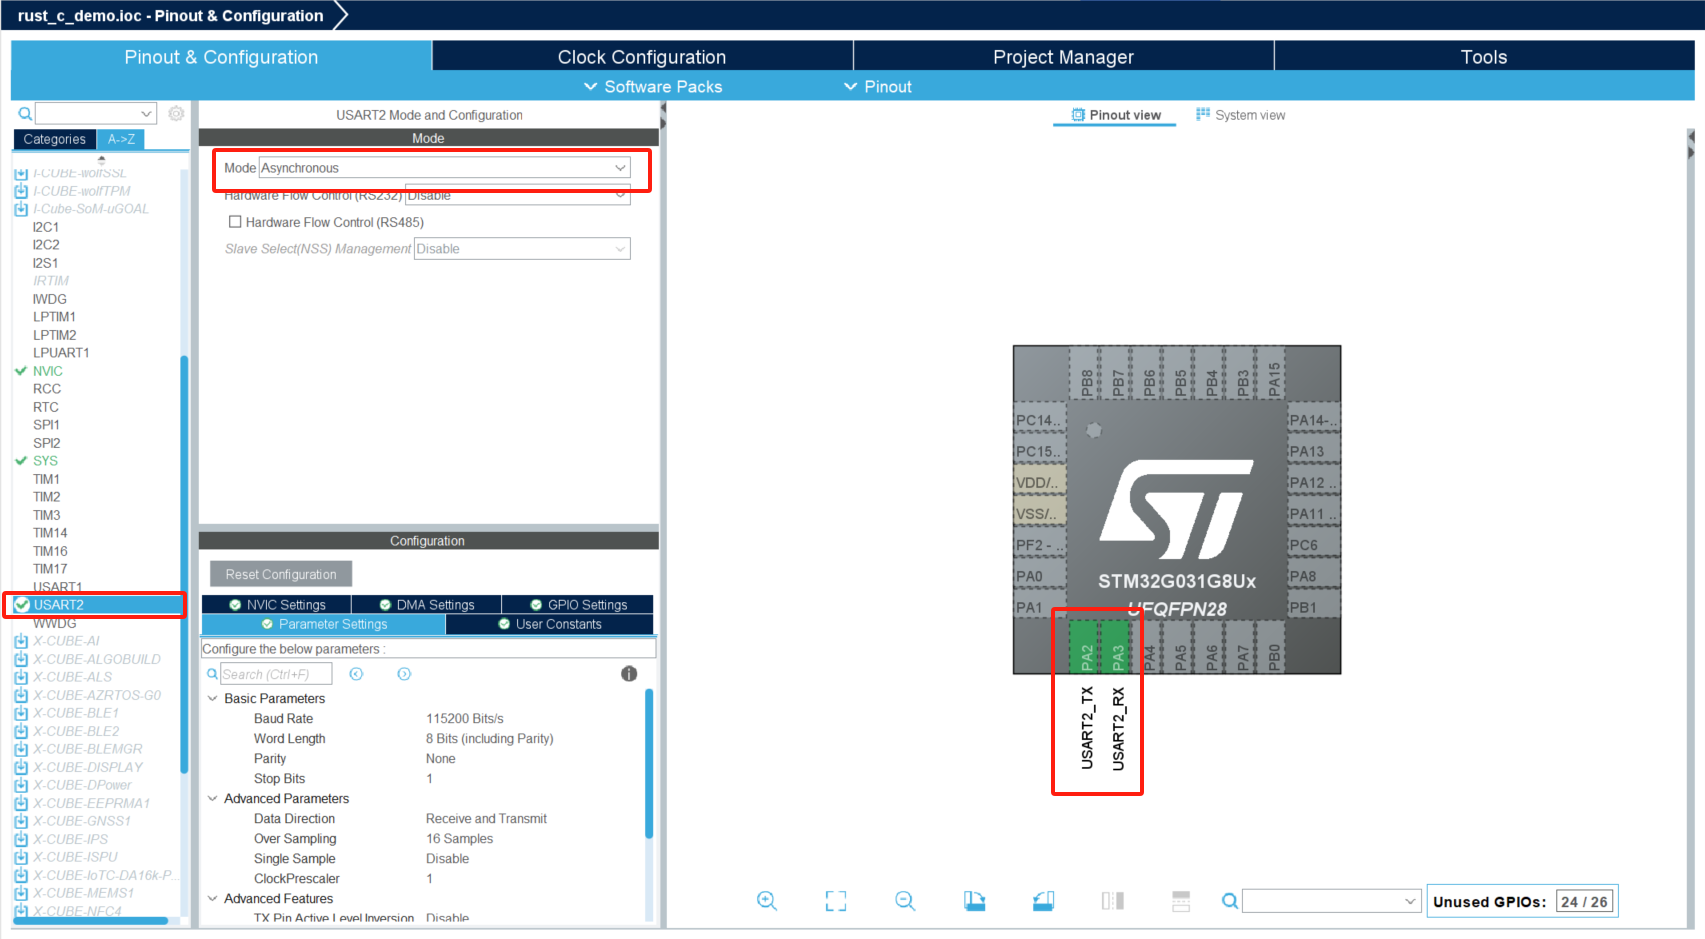
For this simple example, we use USART output, so only initialize USART2.
Select USART2 on the left and configure mode to Asynchronous mode, which will automatically configure pins:
Then CTRL+S to save, CubeIDE will automatically generate code:

Add the following code to main.c to support printf:
#ifdef __GNUC__
#define PUTCHAR_PROTOTYPE int __io_putchar(int ch)
#else
#define PUTCHAR_PROTOTYPE int fputc(int ch, FILE *f)
#endif

PUTCHAR_PROTOTYPE
{
  HAL_UART_Transmit(&huart2, (uint8_t *)&ch, 1,HAL_MAX_DELAY);
  return ch;

}
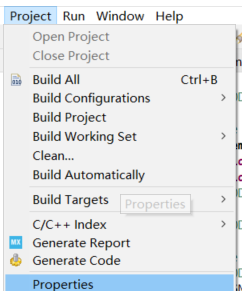
Add floating point printf support in Project/Properties/C/C++ Build/Settings/Tool Settings:

Now an STM32 C template is complete. Add the lib_demo library. First compile lib_demo:
cargo build --release --target thumbv6m-none-eabi
Find the lib_demo.a file and add it along with lib_demo.h file to the Src and Inc directories of the STM32CubeIDE project:
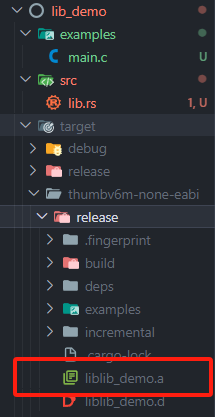
Right-click refresh in CUBEIDE to see the added files:

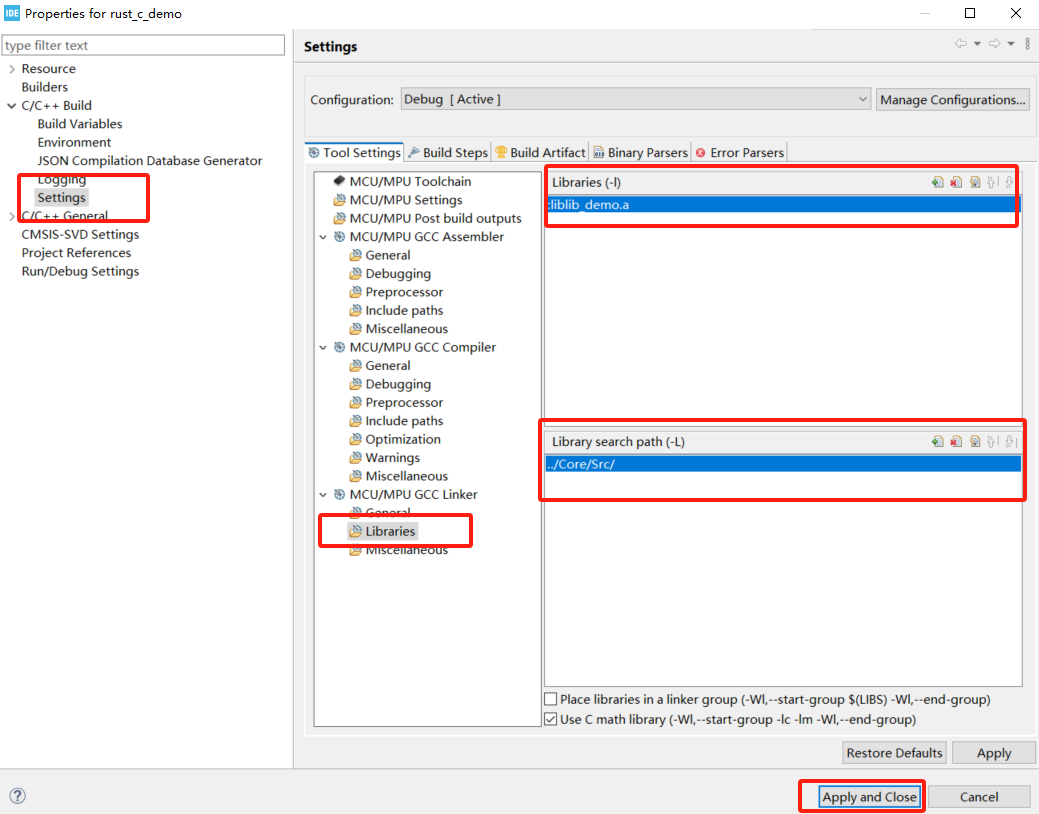
Finally, you need to add this library to the project:
In Project/Properties, select and add the library:
Add to main.c:
#include "lib_demo.h"
...
int main(void)
{
...

  /* USER CODE BEGIN 2 */
  int a = 10, b = 5;
  printf("Integer operations:\n");
  printf("%d + %d = %d\n", a, b, add(a, b));
  printf("%d - %d = %d\n", a, b, subtract(a, b));
  printf("%d * %d = %d\n", a, b, multiply(a, b));
  printf("%d / %d = %d\n", a, b, divide(a, b));
  // Test divide by zero
  printf("%d / %d = %d (divide by zero protection)\n", a, 0, divide(a, 0));
  // Test floating point division
  double x = 10.5, y = 2.5;
  printf("\nFloating point operations:\n");
  printf("%.2f / %.2f = %.2f\n", x, y, divide_float(x, y));
  printf("%.2f / %.2f = %.2f (divide by zero protection)\n", x, 0.0, divide_float(x, 0.0));
  /* USER CODE END 2 */
...
}
Click debug and run to see the output in the serial terminal:

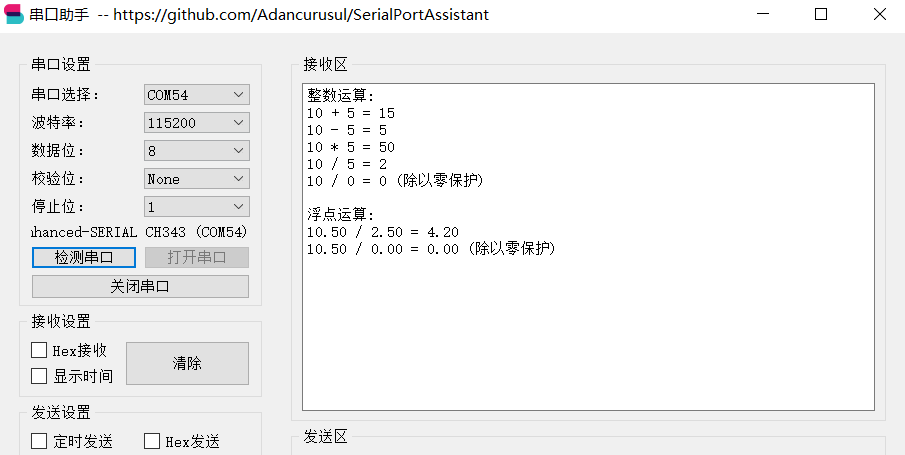
This completes embedding a Rust library into an STM32 C language project.
Summary
This is just using the simplest example for illustration. In actual applications, you can implement complex logic that requires safety guarantees in Rust, then embed it into C projects. For example, protocol encoding/decoding, calculations, etc.
Using Vec and Other Containers in Embedded Systems
Since Rust embedded is mostly in no_std environments, many functions from the standard library cannot be used, such as Vec. However, many people find writing Rust this way too troublesome. Here are two solutions:
- Using heapless
- Using a global allocator
heapless
heapless is an important library in the Rust embedded ecosystem, designed as a collection of static data structures for resource-constrained environments. It provides containers similar to the standard library (such as Vec, String, etc.), but completely independent of heap memory allocation, with all memory allocated at compile time on the stack or in static areas. When using it, you need to specify the maximum capacity through type parameters. Although capacity is fixed and cannot be dynamically expanded, this design ensures predictable memory usage, avoiding memory fragmentation and allocation failure problems common in embedded systems, making it particularly suitable for real-time systems and no-OS environments.
Like this:
#![allow(unused)]
fn main() {
use heapless::Vec;
let mut vec = Vec::<u8, 10>::new();
vec.push(1).unwrap();
vec.push(2).unwrap();
println!("{:?}", vec);
}
Using a Global Allocator
For embedded systems, embedded-alloc is recommended. Usage is very simple:
#![no_std]
#![no_main]
extern crate alloc;
use cortex_m_rt::entry;
use embedded_alloc::LlffHeap as Heap;

#[global_allocator]
static HEAP: Heap = Heap::empty();

#[entry]
fn main() -> ! {
    // Initialize the allocator BEFORE you use it
    {
        use core::mem::MaybeUninit;
        const HEAP_SIZE: usize = 1024;
        static mut HEAP_MEM: [MaybeUninit<u8>; HEAP_SIZE] = [MaybeUninit::uninit(); HEAP_SIZE];
        unsafe { HEAP.init(&raw mut HEAP_MEM as usize, HEAP_SIZE) }
    }
    // now the allocator is ready types like Box, Vec can be used.
    loop { /* .. */ }
}
Simply put, this creates a global allocator that can implement malloc, free, realloc and other operations, allowing us to use containers like Vec, Box that require dynamic memory allocation. You can also create your own implementation of the GlobalAlloc trait as a memory pool.
Using embedded-alloc requires critical section support, so Cargo.toml needs to enable this in cortex-m:
cortex-m = {version = "0.7.7", features = ["critical-section-single-core"]}
Note: Using dynamic memory allocation in embedded systems requires attention to memory fragmentation and out-of-memory (OOM) issues, so it should be used carefully or with sufficient testing.
Rust Development on ESP32
Espressif is one of the few chip manufacturers that officially supports Rust, providing two development approaches: esp-idf-hal and esp-hal.
esp-idf-hal is a Rust wrapper based on the esp-idf C language SDK. Many WiFi and Bluetooth functions are well-adapted and compatible. Since esp-idf provides a newlib environment, the Rust standard library can be built on top of it, so the development environment using esp-idf-hal can use std methods, which greatly improves development efficiency.
esp-hal is a bare-metal hardware abstraction layer for ESP32 (no-std).
For more information, refer to Rust on ESP.
Note: The following requires readers to have experience with ESP32 C language development to understand more easily.
ESP32 Rust Environment Configuration
ESP32 is divided into xtensa architecture and riscv architecture. ESP32 officially provides espup for installing and maintaining toolchains needed for ESP32 series chips.
Two commands complete the installation:
cargo install espup
espup install
Project Generation
Use esp-generate to generate Rust projects for ESP32:
cargo install esp-generate
esp-generate --chip=esp32c6 your-project
Build and run projects directly using cargo commands:
cargo build
cargo run
You can use templates to generate projects:
cargo generate esp-rs/esp-idf-template cargo
Development
ESP32 development can directly refer to examples in esp-idf-hal and esp-hal repositories. There are also many related resources online, so we'll skip over this here. It's worth noting that development under the esp-hal environment can use the Embassy framework, and Bluetooth functionality can use Embassy's newly provided trouble.
Mixed Rust and C
Many times people struggle with "Rust or C". Here's a choice: "or" - mixing Rust and C in a unified project compilation, but not quite like STM32 above where you need to compile first, then embed, then compile C again. ESP provides some mixed programming compilation scripts and project templates that can be seen in the Readme:
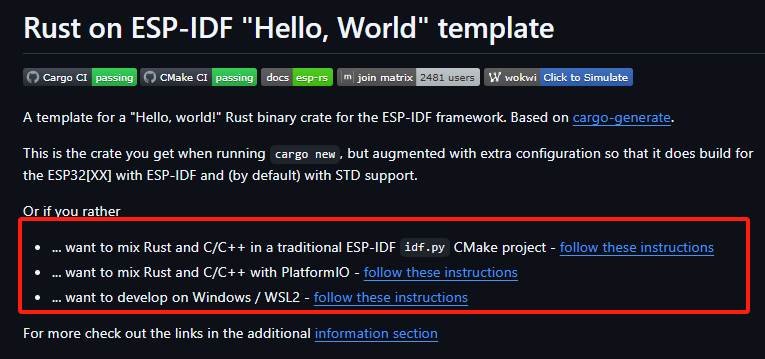
Rust as Component ESP-IDF Method
The method using Cmake construction can be referenced here:
cargo generate --vcs none --git https://github.com/esp-rs/esp-idf-template cmake --name test
Then select the needed toolchain (only RISC-V can use nightly):

This will create an ESP-IDF project using Rust as a component, then build with Cmake.
test/
|-- CMakeLists.txt
|-- main/
|   |-- CMakeLists.txt
|   |-- main.c
|-- sdkconfig
|-- components/
|   |-- rust-test/
|       |-- CMakeLists.txt
|       |-- placeholder.c
|       |-- build.rs
|       |-- Cargo.toml
|       |-- rust-toolchain.toml
|       |-- src/
|           |-- lib.rs
Code writing and building around Rust mainly happens in rust-test under components. The template will generate a sample function in lib.rs:
#![allow(unused)]
fn main() {
#[no_mangle]
extern "C" fn rust_main() -> i32 {
    // It is necessary to call this function once. Otherwise some patches to the runtime
    // implemented by esp-idf-sys might not link properly. See https://github.com/esp-rs/esp-idf-template/issues/71
    esp_idf_svc::sys::link_patches();

    // Bind the log crate to the ESP Logging facilities
    esp_idf_svc::log::EspLogger::initialize_default();

    log::info!("Hello, world!");

    42
}
}
And call it in C:
extern int rust_main(void);

void app_main(void) {
    printf("Hello world from C!\n");

    int result = rust_main();

    printf("Rust returned code: %d\n", result);
}
Build and run completely using esp-idf csdk methods. Will compile the Rust project in component and link with C project:
idf.py set-target [esp32|esp32s2|esp32s3|esp32c2|esp32c3|esp32c6|esp32h2]
idf.py build
idf.py -p /dev/ttyUSB0 flash
idf.py -p /dev/ttyUSB0 monitor
This allows real-time adjustment of Rust code implementation while maintaining esp-idf's original usage methods, such as adding other component libraries in components, like adding cam or arduino as components to the project.
Building with PlatformIO
Many people use platformio (abbreviated as pio) to build ESP32 projects. Here's an introduction to that as well.
The official example provides a template for creating pio projects based on esp-idf construction:
cargo install cargo-pio # Install pio

# cargo pio new <your-project-name> --platform espressif32 --frameworks espidf [--board <your-board-name>]

cargo pio new pio_espidf_demo --platform espressif32 --frameworks espidf --board lilygo-t-display-s3 -- --edition 2021
The board name doesn't matter and can be modified later in platformio.ini. Other boards like adafruit_feather_esp32s3 can also run.
Here we use Lilygo's T-display-s3. Everyone can use any ESP32 they have at hand.

Then use:
pio run
If in VSCode, you can directly select build and run graphically.
You can also create Arduino-based projects:
cargo pio new pio_arduino_demo --platform espressif32 --frameworks arduino --board lilygo-t-display-s3 -- --edition 2021
Project structure:
├──.cargo
│  └──config.toml
├──src
│  ├──dummy.c
│  ├──lib.rs
│  └──main.cpp
├──.gitignore
├──Cargo.toml
├──platformio.cargo.py
├──platformio.git.py
├──platformio.ini
└──platformio.patch.py
Provides simple examples. In lib.rs:
#![allow(unused)]
fn main() {
// Remove if STD is supported for your platform and you plan to use it
#![no_std]

// Remove if STD is supported for your platform and you plan to use it
#[panic_handler]
fn panic(_info: &core::panic::PanicInfo) -> ! {
    loop {}
}

//
// Entry points
//

#[no_mangle]
extern "C" fn arduino_setup() {
}

#[no_mangle]
extern "C" fn arduino_loop() {
}
}
In main.cpp:
#include <Arduino.h>

extern "C" void arduino_setup();
extern "C" void arduino_loop();

void setup() {
    arduino_setup();
}

void loop() {
    arduino_loop();
}
Defaults to using no-std. Since ESP32 supports using std libraries like Vec, as mentioned earlier that ESP32 can use std environment, here we'll modify it to use std environment as an example.
First comment out no-std related dependencies in lib.rs:
#![allow(unused)]
fn main() {
// Remove if STD is supported for your platform and you plan to use it
// #![no_std]

// // Remove if STD is supported for your platform and you plan to use it
// #[panic_handler]
// fn panic(_info: &core::panic::PanicInfo) -> ! {
//     loop {}
// }
}
Currently ESP32S3 needs to use espup construction. We add a rust-toolchain.toml file in the root directory:
[toolchain]
channel = "esp"
Then add any print:
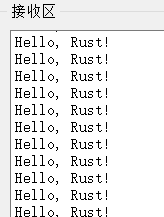
#![allow(unused)]
fn main() {
#[no_mangle]
extern "C" fn arduino_loop() {
    use std::string::String;
    // Print a string
    let s = String::from("Hello, Rust!");
    println!("{}", s);

}
}
Build, compile, flash and then get an error:
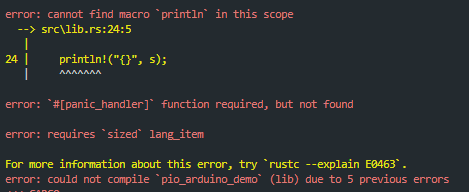
Didn't we say std is supported? Why the error? Actually, std support needs to be added in .cargo/config.toml. Originally it was:
[unstable]
build-std = ["core", "panic_abort"]
build-std-features = ["panic_immediate_abort"]
Modify build-std to add std support:
build-std = ["std","core", "panic_abort"]
Command line compile and run or select build and run graphically in VSCode:

You can see that Rust is also built during construction:

Get serial output:
This mixed programming is especially suitable for adding Rust safety support without refactoring existing projects.
For example, you can modify demos provided in the official repository.
Imitating the official pio configuration, add to platformio.ini:
build_flags =
    -DLV_LVGL_H_INCLUDE_SIMPLE
    -DARDUINO_USB_CDC_ON_BOOT=1
    ; -UARDUINO_USB_CDC_ON_BOOT
    -DDISABLE_ALL_LIBRARY_WARNINGS
    -DARDUINO_USB_MODE=1
    ; Choose different options according to different driver chips
    ; Early use of CST328
    -DTOUCH_MODULES_CST_MUTUAL
    ; Use CST816 by default
    ; -DTOUCH_MODULES_CST_SELF
Copy several files from the example factory folder to the current project.
Src directory structure:
├──dummy.c
├──factory.ino
├──factory.ino.cpp
├──factory_gui.cpp
├──factory_gui.h
├──font_Alibaba.c
├──lib.rs
├──lilygo1_gif.c
├──lilygo2_gif.c
├──pin_config.h
└──zones.h
We add several test functions:
#![allow(unused)]
fn main() {
#[no_mangle]
pub extern "C" fn rust_add_test(a: i32, b: i32) -> i32 {
    a + b
}

#[no_mangle]
pub extern "C" fn rust_multiply(a: i32, b: i32) -> i32 {
    a * b
}

#[no_mangle]
pub extern "C" fn rust_fibonacci(n: i32) -> i32 {
    if n <= 0 {
        return 0;
    } else if n == 1 {
        return 1;
    }
    let mut a = 0;
    let mut b = 1;
    let mut temp;
    for _ in 2..=n {
        temp = a + b;
        a = b;
        b = temp;
    }
    b
}

#[no_mangle]
pub extern "C" fn rust_find_max(arr: *const i32, len: usize) -> i32 {
    if arr.is_null() || len == 0 {
        return 0;
    }
    let slice = unsafe { std::slice::from_raw_parts(arr, len) };
    match slice.iter().max() {
        Some(&max) => max,
        None => 0,
    }
}

#[no_mangle]
pub extern "C" fn rust_string_length(s: *const u8) -> usize {
    if s.is_null() {
        return 0;
    }

    let mut len = 0;
    unsafe {
        while *s.add(len) != 0 {
            len += 1;
        }
    }
    len
}
}
Add tests in factory.ino:
extern "C" {
  int rust_add_test(int a, int b);
  int rust_multiply(int a, int b);
  int rust_fibonacci(int n);
  int rust_find_max(const int* arr, size_t len);
  size_t rust_string_length(const char* s);
}

void run_rust_tests(void)
{
    // Clear previous UI elements
    lv_obj_clean(lv_scr_act());
    // Create title
    lv_obj_t *title_label = lv_label_create(lv_scr_act());
    lv_obj_align(title_label, LV_ALIGN_TOP_MID, 0, 10);
    lv_obj_set_style_text_font(title_label, &lv_font_montserrat_14, 0);
    lv_label_set_text(title_label, "Rust Function Tests");
    // Prepare test results
    String result = "";
    // Test addition function
    int add_result = rust_add_test(10, 25);
    result += "Add: 10 + 25 = ";
    result += String(add_result);
    result += "\n";
    // Test multiplication function
    int mul_result = rust_multiply(12, 5);
    result += "Multiply: 12 * 5 = ";
    result += String(mul_result);
    result += "\n";
    // Test fibonacci function
    int fib_result = rust_fibonacci(10);
    result += "Fibonacci(10) = ";
    result += String(fib_result);
    result += "\n";
    // Test find max function
    int arr[] = {3, 7, 1, 9, 4, 6};
    int max_result = rust_find_max(arr, 6);
    result += "Array Max: ";
    result += String(max_result);
    result += "\n";
    // Test string length function
    const char* test_str = "Hello, Rust!";
    size_t len_result = rust_string_length(test_str);
    result += "String Length: ";
    result += String(len_result);
    result += "\n";
    // Create result display area
    lv_obj_t *results_label = lv_label_create(lv_scr_act());
    lv_obj_align(results_label, LV_ALIGN_CENTER, 0, 0);
    lv_obj_set_width(results_label, LV_PCT(90));
    lv_obj_set_style_text_font(results_label, &lv_font_montserrat_14, 0);
    lv_label_set_long_mode(results_label, LV_LABEL_LONG_SCROLL);
    lv_label_set_text(results_label, result.c_str());
    // Output to serial
    Serial.println("=== Rust Test Results ===");
    Serial.println(result);
    // Create back button
    lv_obj_t *back_btn = lv_btn_create(lv_scr_act());
    lv_obj_align(back_btn, LV_ALIGN_BOTTOM_MID, 0, -10);
    lv_obj_set_width(back_btn, 120);
    lv_obj_set_height(back_btn, 40);
    lv_obj_t *back_label = lv_label_create(back_btn);
    lv_label_set_text(back_label, "Back");
    lv_obj_center(back_label);
    lv_obj_add_event_cb(back_btn, [](lv_event_t *e) {
        lv_obj_clean(lv_scr_act());
        lv_obj_t *log_label = lv_label_create(lv_scr_act());
        lv_obj_align(log_label, LV_ALIGN_TOP_LEFT, 0, 0);
        lv_obj_set_width(log_label, LV_PCT(100));
        lv_label_set_long_mode(log_label, LV_LABEL_LONG_SCROLL);
        lv_label_set_recolor(log_label, true);
        lv_label_set_text(log_label, "Scan WiFi");
        wifi_test();
    }, LV_EVENT_CLICKED, NULL);
    // Send test result message
    lv_msg_send(MSG_RUST_TEST_RESULT, result.c_str());
}

void rust_tests(void)
{
    // Clear current screen
    lv_obj_clean(lv_scr_act());
    // Show loading indicator
    lv_obj_t *spinner = lv_spinner_create(lv_scr_act(), 1000, 60);
    lv_obj_set_size(spinner, 100, 100);
    lv_obj_center(spinner);
    lv_obj_t *load_label = lv_label_create(lv_scr_act());
    lv_label_set_text(load_label, "Running Rust Tests...");
    lv_obj_align(load_label, LV_ALIGN_BOTTOM_MID, 0, -40);
    // Brief delay to show loading effect
    LV_DELAY(1000);
    // Delete loading indicator
    lv_obj_del(spinner);
    lv_obj_del(load_label);
    // Run detailed Rust tests
    run_rust_tests();
}
You can see the development board screen will display test results:

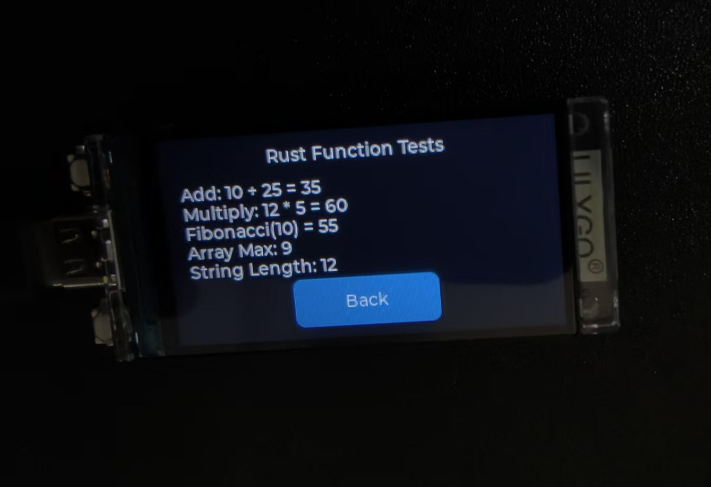
This completes the basics of mixed Rust and C programming for ESP32. You can now start your own projects.
You can also use similar methods as STM32 to find .a files in target and copy them to other projects for use:
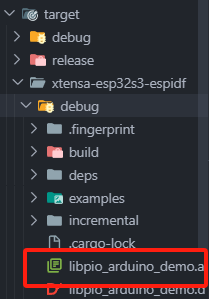
Copy to other project directories and add dependencies in build_flags.
Using this method, you can add a RustTest button to projects like T-Display-S3-Pro Cellphone project.
Put the .a file in the root directory and add to platformio.ini:
    -L"${PROJECT_DIR}"
    -lpio_arduino_demo
Then similarly add buttons and functions to get:

Click the button to see running examples:

And serial output:
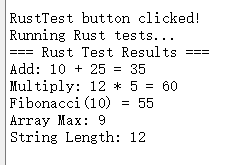
This concludes the entire guide. Now begin your embedded Rust journey!